Have you ever wanted to turn a simple piece of text into a professional-looking video presenter without hiring actors, recording videos, or using complex animation software?
With Azure AI Video Avatars, that’s now possible.
In this blog, we’ll walk through how Azure can transform plain text into a realistic talking avatar video, and how you can build a simple application that automates the entire process.
From Text to a Talking Video
At a high level, the process is remarkably simple:
Text → Azure AI → Human-like Avatar MP4 Video
All you need is a script. Azure handles everything else:
- Converting text into natural speech
- Synchronizing lip movements
- Animating facial expressions
- Rendering the avatar
- Generating a downloadable MP4 video
The result is a realistic presenter video that can be used for training, onboarding, marketing, education, and more.
How Azure Creates the Video
Although it looks like a single API call from the outside, Azure performs several AI-powered steps behind the scenes:
1. Text Processing
- Analyzes the input text
- Handles punctuation and pauses
- Neural Text-to-Speech
2. Converts text into natural-sounding speech
- Lip-Sync Generation
- Maps spoken sounds to mouth movements
3. Avatar Rendering
- Animates facial expressions and head movements
4. Video Encoding
- Produces a final MP4 video ready for viewing or download
The beauty of this approach is that developers don’t need expertise in animation, video editing, or character modeling. Azure takes care of the complexity.
What You Need to Get Started
To build your own text-to-avatar application, you’ll need:
- An Azure subscription
- An Azure AI Speech resource with Avatar capability enabled
- Azure API Key and Region (currently East US)
- A lightweight Python backend
- A simple HTML/JavaScript frontend
That’s all it takes to get started.
Solution Architecture
The application uses the Azure Batch Avatar Synthesis API.
The workflow looks like this:
- The user enters text in a web page.
- The request is sent to a Python backend.
- The backend submits a rendering job to Azure.
- Azure processes the request asynchronously.
- The frontend polls for completion.
- Once finished, Azure returns an MP4 video URL.
- The video is played directly in the browser or downloaded locally.
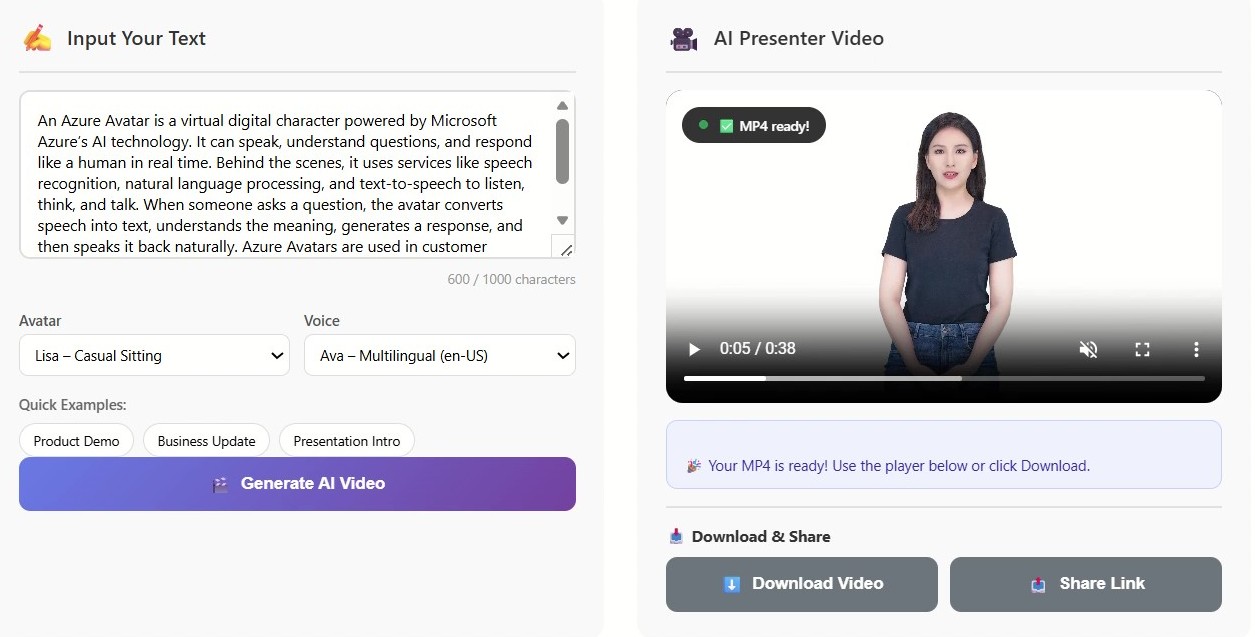
Step 1: Create an Azure AI Speech Resource
Start by creating an Azure AI Speech resource in the Azure portal.
Make sure the resource is created in the East US region because Azure Video Avatars are currently available there.
After creation, note down:
- Speech API Key
- Region Name
These credentials will be used for both speech generation and avatar rendering.
Step 2: Choose an Avatar and Voice
Azure provides several prebuilt avatar characters and styles.
For example:
Avatar Character: Lisa
Available Styles:
- Casual Sitting
- Graceful Sitting
- Technical Standing
Popular Voices:
- en-US-AvaMultilingualNeural
- en-US-JennyNeural
You can mix and match avatars, styles, and voices to create different presentation experiences.
Step 3: Prepare the Script
The simplest approach is to provide plain text:
Hello! Welcome to our AI platform.
Azure automatically converts the text into speech and animates the avatar.
For advanced scenarios, you can use SSML (Speech Synthesis Markup Language) to control:
- Pauses
- Speaking rate
- Emphasis Pronunciation
For most business applications, plain text is more than sufficient.
Step 4: Submit the Rendering Job
Azure Batch Avatar Synthesis works asynchronously.
When a user clicks Generate AI Video, the application:
- Creates a unique job ID.
- Sends the text, avatar selection, and voice configuration to Azure.
- Azure queues the rendering request.
- Azure returns a job status indicating that processing has started.
- The rendering happens entirely in Azure while the user continues interacting with the application.
Step 5: Monitor the Job Status
Video generation takes time because Azure needs to synthesize speech, animate the avatar, and render the video.
The frontend periodically checks the job status:
- NotStarted – Job is queued
- Running – Rendering in progress
- Succeeded – Video is ready
- Failed – Rendering encountered an issue
Once the status becomes Succeeded, Azure provides a secure URL to the generated MP4 file.
Step 6: View or Download the Video
When rendering is complete:
- The video can be played directly in the browser.
- Users can download the MP4 for offline use.
- The output is a standard H.264 MP4 file compatible with modern browsers and media players.
What We Observed
After testing the solution with multiple scripts, a few observations stood out:
What Works Well
- Very simple setup
- High-quality video output
- Accurate lip synchronization
- Professional-looking avatars
- No animation expertise required
Performance
Typical rendering times were:
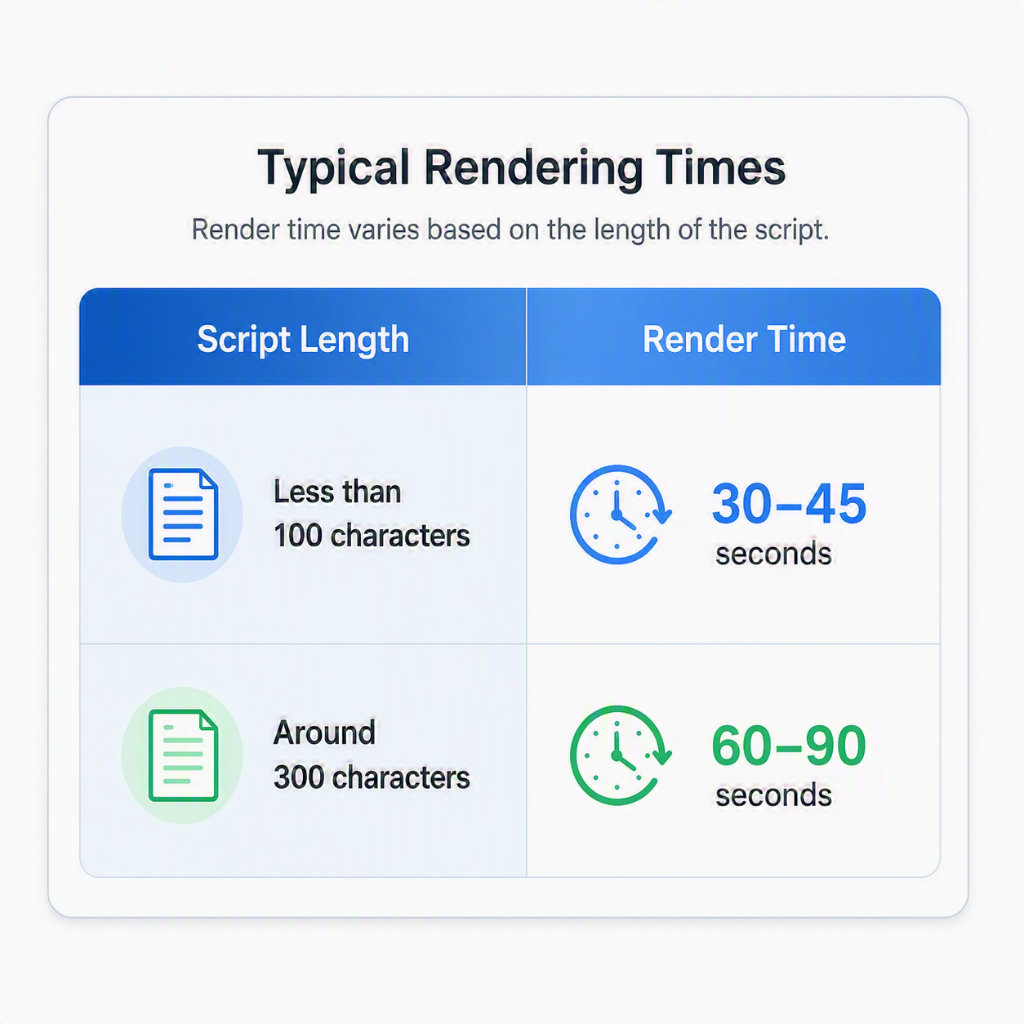
Rendering time increases as the script becomes longer.
Current Limitations
While the service is impressive, there are some limitations:
- Batch processing only (not real-time)
- Rendering requires a waiting period
- Output is 2D video only
- Limited facial-expression customization
- Limited background customization
- Usage costs increase with volume
For real-time conversations and streaming avatars, Azure provides a separate WebRTC-based solution.